算子实现
下文将以Matmul+LeakyRelu融合算子的实现为例,介绍Mix融合算子的设计和实现流程。该样例仅支持在Atlas A2训练系列产品/Atlas 800I A2推理产品上运行。
算子的设计过程分为算子分析、数据流分析、Tiling策略设计三部分。
算子分析
算子分析是指明确算子的数学表达式、输入、输出,核函数的名称等信息。
- 明确算子的数学表达式及计算逻辑。该算子的计算逻辑为,先进行一个矩阵乘操作,然后将矩阵乘的结果与一个alpha参数进行LeakyRelu操作。数学表达式如下:
1c = LeakyRelu(a * b + bias, alpha);
- 明确输入和输出。
- MatMul+Leakyrelu算子输入为a、b、bias、alpha,输出为c。
- 本样例中算子输入a、b支持的数据类型为half(float16),算子输入bias、alpha支持的数据类型为float32,算子输出c的数据类型为float32。
- 输入矩阵a的形状为[M,K],输入矩阵b的形状为[K, N],输出矩阵c的形状为[M,N],输入bias的形状为[1, N]。
- 算子输入输出支持的数据格式为:ND。
- 确定核函数名称和参数。
- 您可以自定义核函数名称,本样例中核函数命名为matmul_leakyrelu_custom。
- 根据对算子输入输出的分析,确定核函数的参数a,b,bias,alpha,c;a,b, bias,alpha为输入在Global Memory上的内存地址,c为输出在Global Memory上的内存地址。
算子类型(OpType) |
MATMUL_LEAKYRELU |
|||
|---|---|---|---|---|
算子输入 |
name |
shape |
data type |
format |
a |
[M, K] |
half |
ND |
|
b |
[K, N] |
half |
ND |
|
bias |
[1, N] |
float32 |
- |
|
alpha |
- |
float32 |
- |
|
算子输出 |
c |
[M, N] |
float32 |
ND |
核函数名称 |
matmul_leakyrelu_custom |
|||
数据流分析
进行算子的数据流分析:数据流向为在Cube核上完成Matmul计算后将数据搬运至Vector核进行LeakyRelu计算。根据上述数据流并结合融合算子的编程范式,规划并行的流水任务。如下图所示:
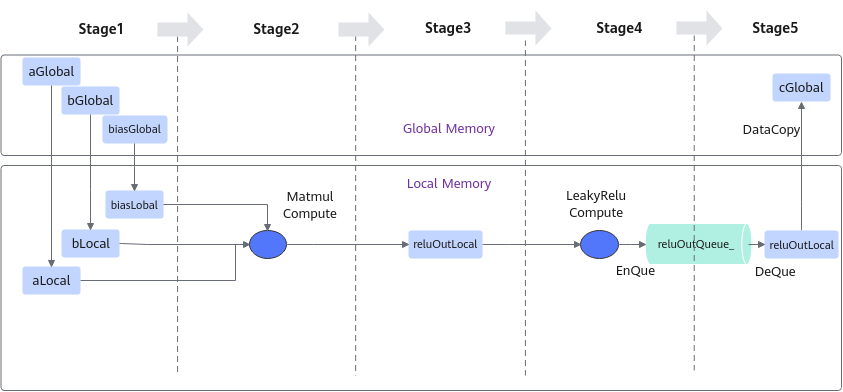
- 将输入数据从Global Memory搬运到Cube核。
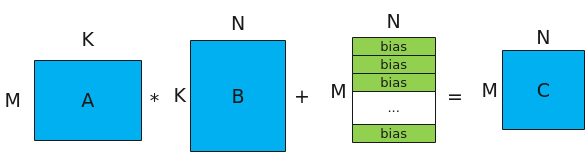
- 进行MatMul内部的计算,计算公式和计算示意图如下:注:bias的shape为[1, N], 对A*B结果矩阵的每一行都采用该bias进行偏置。图1 Matmul矩阵乘示意图
- 将MatMul的计算结果搬运到Vector核。
- 进行Vector矢量计算,该样例中进行LeakyReLU计算。
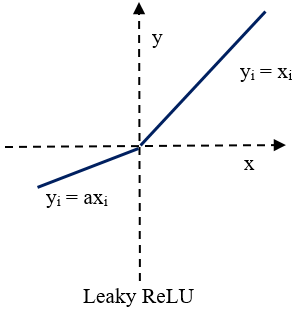
Leaky ReLU(带泄露线性整流函数)激活函数,是人工神经网络中一种常用的激活函数,其数学表达式和函数图像如下所示:

- 将输出结果搬运到Global Memory。
前三步的内容都封装在Matmul高阶API内,本样例中可以简化为3个stage。如下图所示:
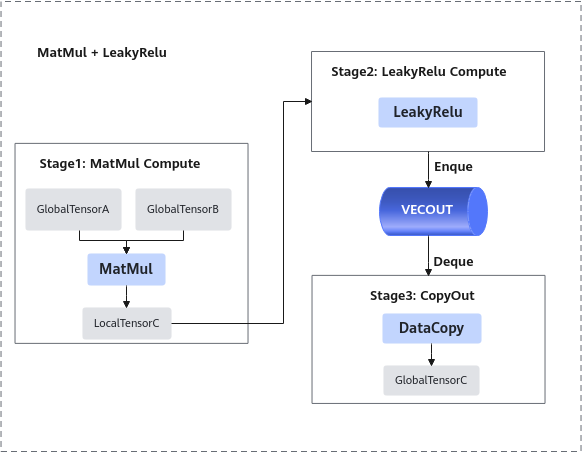
根据上述分析,明确实现过程中会使用到Matmul高阶API接口,LeakyRelu Vector计算接口、DataCopy、EnQue、DeQue接口。
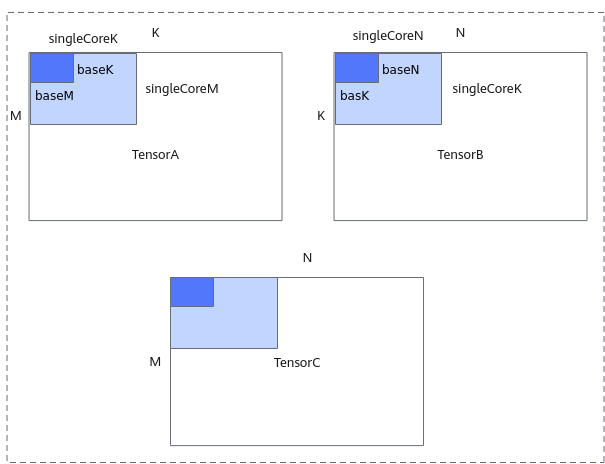
Tiling策略设计
Tiling策略的设计主要包括多核切分和核内切分策略。
- 多核切分: 根据当前核数,对输入shapeM, K, N进行多核切分,得到单核内shape大小singleCoreM, singleCoreK, singleCoreN。
- 核内切分: 根据Local Memory的大小约束,对单核内的shape大小进一步切分,得到A、B、C矩阵参与一次矩阵乘指令的shape大小baseM, baseN, baseK 。切分时需要注意:GetTensorC的结果如果放在LocalMemory(UB)上,需要注意,baseM * baseN的大小不能超出UB的限制。
切分策略示意图如下,更多切分策略相关原理请参考数据分块(Tiling)。
算子实现
在矩阵编程章节,我们得知Ascend C提供一组Matmul高阶API,封装了常用的切分和数据搬运、计算的算法逻辑,方便用户快速实现Matmul矩阵乘法的运算操作。融合算子中的矩阵编程的部分实现与之类似,开发者在host侧通过调用API自动获取Tiling参数,该参数传递到kernel侧后,在初始化操作时传入,通过几个简单的API即可完成矩阵乘操作。再结合上文的融合算子的编程范式,融合算子实现的步骤如下。完整样例请参考LINK。

kernel侧实现的代码框架如下,在完成Matmul对象的初始化、左矩阵A、右矩阵B、Bias的设置后,通过单次Iterate叠加while循环的方式完成后续的Matmul计算、LeakyRelu计算、CopyOut流程。
1 2 3 4 5 6 7 8 9 10 11 12 13 14 15 16 17 18 19 20 21 |
template<typename aType, typename bType, typename cType, typename biasType> __aicore__ inline void MatmulLeakyKernel<aType, bType, cType, biasType>::Process(){ uint32_t computeRound = 0; // Matmul对象初始化 REGIST_MATMUL_OBJ(&pipe, GetSysWorkSpacePtr(), matmulObj); // 设置Matmul的输入(包括左矩阵、右矩阵、bias) matmulObj.Init(&tiling); matmulObj.SetTensorA(aGlobal); matmulObj.SetTensorB(bGlobal); matmulObj.SetBias(biasGlobal); // 调用matmul iterate获取一块[baseM, baseN]的计算结果 while (matmulObj.template Iterate<true>()) { MatmulCompute(); LeakyReluCompute(); CopyOut(computeRound); computeRound++; } matmulObj.End(); } |
Matmul计算、LeakyRelu计算、CopyOut的具体实现代码如下:
- Matmul计算:
- 将输入数据从Global Memory搬运到Cube核。
- 进行MatMul内部的计算。
- 将MatMul的计算结果搬运到Vector核。
 1
 2
 3
 4
 5
 6
 7
 8
 9
10
11
12
13
14
15
16
17
18
19
20
21
template<typename aType, typename bType, typename cType, typename biasType>
__aicore__ inline void MatmulLeakyKernel<aType, bType, cType, biasType>::Process(){
    uint32_t computeRound = 0;
    // ...
    // 调用matmul iterate获取一块[baseM, baseN]的计算结果
    while (matmulObj.template Iterate<true>())
    {
        MatmulCompute();
        // ...
        computeRound++;

    }
    matmulObj.End();
}

template<typename aType, typename bType, typename cType, typename biasType>
__aicore__ inline void MatmulLeakyKernel<aType, bType, cType, biasType>::MatmulCompute(){
    reluOutLocal = reluOutQueue_.AllocTensor<cType>();
    // 调用GetTensorC将Matmul的计算结果搬运到Vector核。
    matmulObj.template GetTensorC<true>(reluOutLocal, false, true);
}
- LeakyRelu计算。
1
2
3
4
5
6
// 调用LeakyRule接口进行计算
template<typename aType, typename bType, typename cType, typename biasType>
__aicore__ inline void MatmulLeakyKernel<aType, bType, cType, biasType>::LeakyReluCompute(){
    AscendC::LeakyRelu(reluOutLocal, reluOutLocal, (cType)alpha, tiling.baseM * tiling.baseN);
    reluOutQueue_.EnQue(reluOutLocal);
}
- CopyOut,将输出结果搬运到Global Memory。
 1
 2
 3
 4
 5
 6
 7
 8
 9
10
11
12
13
// 将结果搬出到GM
template<typename aType, typename bType, typename cType, typename biasType>
__aicore__ inline void MatmulLeakyKernel<aType, bType, cType, biasType>::CopyOut(uint32_t count){
    reluOutQueue_.DeQue<cType>();
    const uint32_t roundM = tiling.singleCoreM / tiling.baseM;
    const uint32_t roundN = tiling.singleCoreN / tiling.baseN;
    uint32_t startOffset = (count % roundM * tiling.baseM * tiling.N + count / roundM * tiling.baseN);
    AscendC::DataCopyParams copyParam = {(uint16_t)tiling.baseM,
        (uint16_t)(tiling.baseN * sizeof(cType) / DEFAULT_C0_SIZE), 0,
        (uint16_t)((tiling.N - tiling.baseN) * sizeof(cType) / DEFAULT_C0_SIZE)};
    AscendC::DataCopy(cGlobal[startOffset], reluOutLocal, copyParam);
    reluOutQueue_.FreeTensor(reluOutLocal);
}
host侧自动获取Tiling参数的关键步骤介绍如下:
- 创建Tiling对象。
1
2
auto ascendcPlatform = platform_ascendc::PlatformAscendC(context->GetPlatformInfo());
matmul_tiling::MultiCoreMatmulTiling cubeTiling(ascendcPlatform);
- 设置A、B、Bias的数据类型和格式。
1
2
3
4
cubeTiling.SetAType(matmul_tiling::TPosition::GM, matmul_tiling::CubeFormat::ND, matmul_tiling::DataType::DT_FLOAT16);
cubeTiling.SetBType(matmul_tiling::TPosition::GM, matmul_tiling::CubeFormat::ND, matmul_tiling::DataType::DT_FLOAT16);
cubeTiling.SetCType(matmul_tiling::TPosition::LCM, matmul_tiling::CubeFormat::ND, matmul_tiling::DataType::DT_FLOAT);
cubeTiling.SetBiasType(matmul_tiling::TPosition::GM, matmul_tiling::CubeFormat::ND, matmul_tiling::DataType::DT_FLOAT);
- 设置矩阵shape信息。
1
2
cubeTiling.SetShape(M, N, K);
cubeTiling.SetOrgShape(M, N, K);
- 设置可用空间大小信息。
1cubeTiling.SetBufferSpace(-1, -1, -1);
- 按需设置其他参数,比如设置bias参与计算。
1cubeTiling.SetBias(true);
- 获取Tiling参数。
1
2
3
4
MatmulLeakyreluCustomTilingData tiling;
if (cubeTiling.GetTiling(tiling.cubeTilingData) == -1){
    return ge::GRAPH_FAILED;
}
- Tiling参数的序列化保存等其他操作。

- 特别的对于多核场景,需要通过SetDim接口设置Matmul计算所用的核数,MIX模式(包含矩阵计算和矢量计算)的设置规则如下:
- 分离架构:Matmul API都是从AIV侧发起的,调用Iterate计算时在AIV侧只会起到通知的作用,通知AIC去做矩阵计算,计算完成后AIC告知AIV计算完成,在开发者层面感知的是AIV的核数,比如:SetBlockDim时可以设置为20,启动20个AI Core(AIC AIV的组合),SetDim设置成40,表示按照40个AIV进行切分。
- 耦合架构:SetBlockDim加载的核数就是Matmul API实际计算会用到的核数,SetDim和SetBlockDim设置的值是一样的。
- Matmul高阶API内部实现时需要使用系统workspace,开发者需要:
- 在host侧Tiling实现时,设置总的workspace的数值大小(包含用户workspace和系统workspace),workspace空间由框架来申请并管理。系统workspace的空间大小通过GetLibApiWorkSpaceSize获取。
1
2
3
4
size_t userWorkspaceSize = 0;
size_t systemWorkspaceSize = ascendcPlatform.GetLibApiWorkSpaceSize();
size_t *currentWorkspace = context->GetWorkspaceSizes(1);
currentWorkspace[0] = userWorkspaceSize + systemWorkspaceSize;
- 若算子工程不是自定义算子工程,也不是带有-DHAVE_WORKSPACE编译宏的Kernel直调算子工程,kernel侧需要在Matmul初始化前,通过SetSysWorkSpace设置系统workspace。
1
2
3
4
5
// 使用Matmul时必须设置workspace空间
SetSysWorkspace(workspace);
if (GetSysWorkSpacePtr() == nullptr) {
    return;
}
- 在host侧Tiling实现时,设置总的workspace的数值大小(包含用户workspace和系统workspace),workspace空间由框架来申请并管理。系统workspace的空间大小通过GetLibApiWorkSpaceSize获取。