


Super-Resolution Image Algorithm Model Introduction
SRCNN and FSRCNN
The following figure illustrates the typical models of the super-resolution networks: SRCNN and FSRCNN.
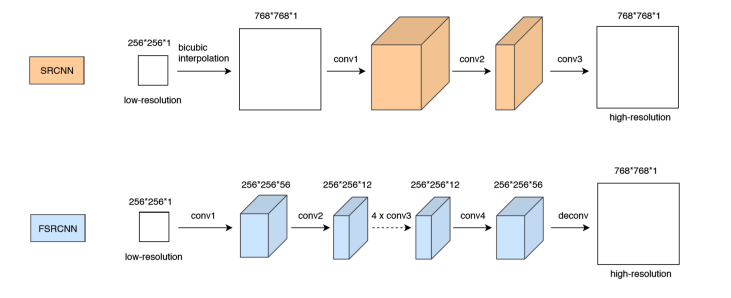
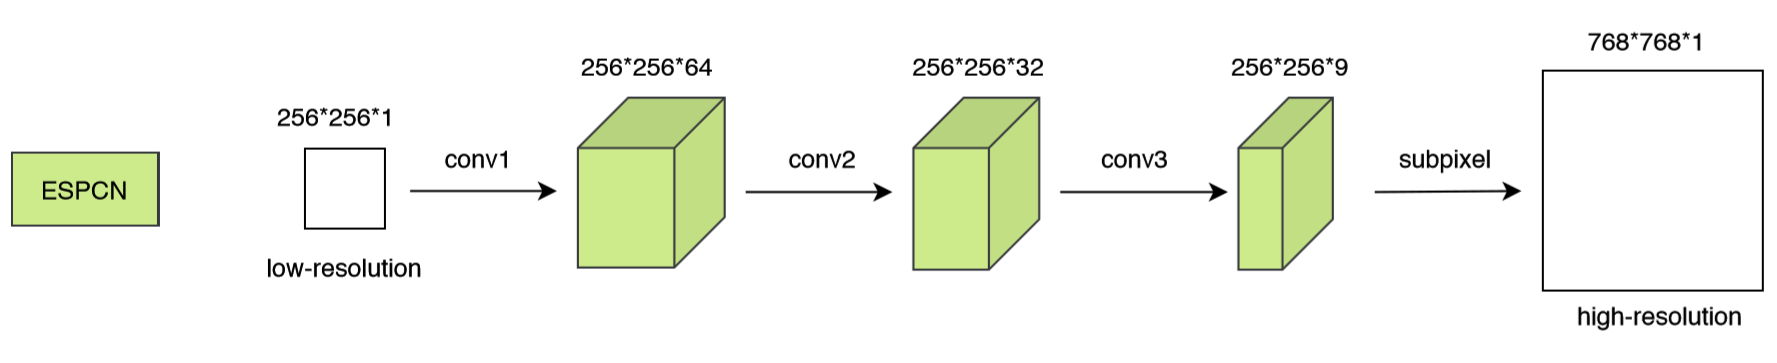
The following figure illustrates the ESPCN model.
Algorithm Model Implementation
Constructing a Conversion System for the Super-Resolution Algorithm
Two image super-resolution conversion systems are built on the Atlas 200 DK AI Developer Kit (Model: 3000): one oriented to local image files and the other oriented to real-time camera image data, as shown in the following figures.
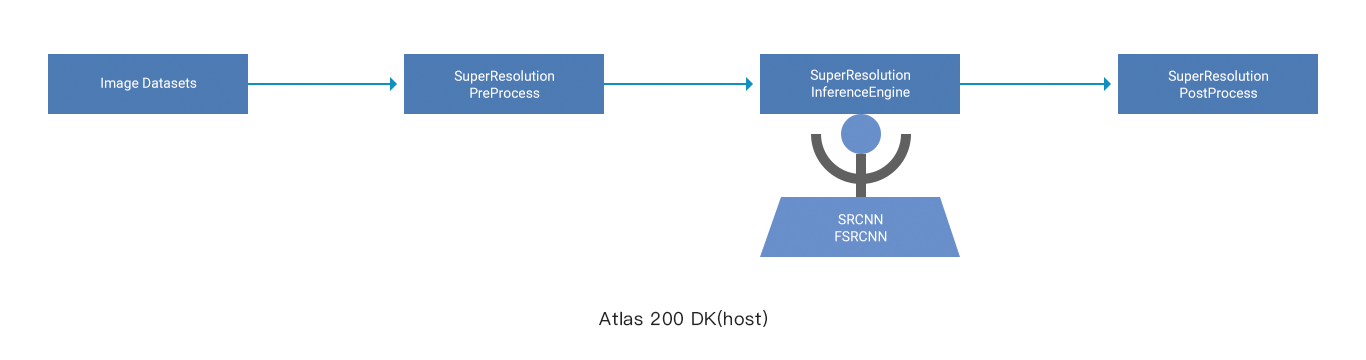
In the first system, local image files are the input. Image data read from an image file will be preprocessed and sent to a super-resolution image algorithm model for resolution improvement, and then stored in a local storage device. The specific process is as follows:
1. The ImageDatasets module reads low-resolution image data through OpenCV. Then, use OpenCV to perform bicubic interpolation amplification for an SRCNN model, which is not required for FSRCNN and ESPCN models.
2. In the pre-processing module SuperResolutionPreProcess, use EZDVPP to resize the image so that the image resolution matches the model input resolution, for example, 256 x 256. It is recommended that the input image resolution be the same as the model input resolution to spare the resizing trouble.
3. Use SuperResolutionInferenceEngine to load the trained SRCNN, FSRCNN, or ESPCN super-resolution models and corresponding weight files for inference. Then, image data after width and height resolution improvement is obtained.
4. Perform post-processing on the received grayscale image by using SuperResolutionPostProcess and save the image through OpenCV.
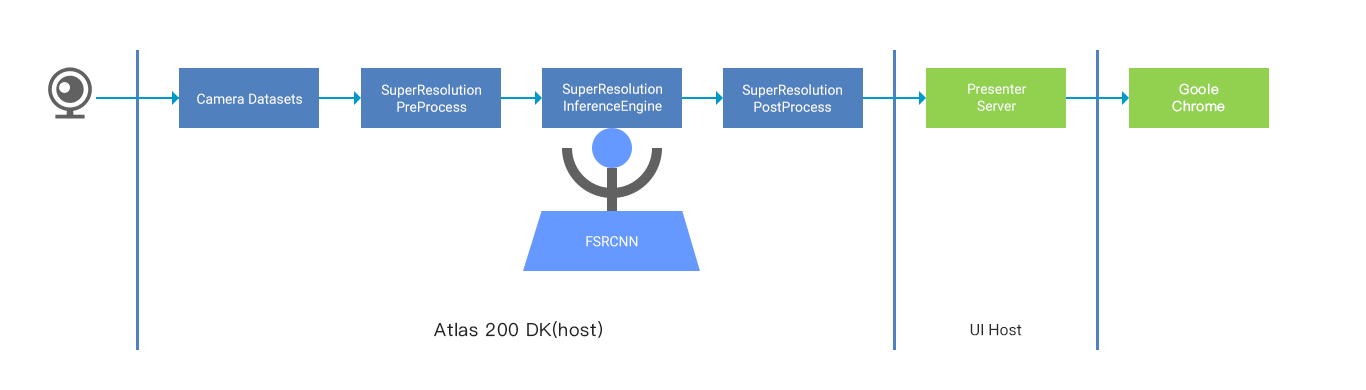
In the second system, the low-resolution video data obtained by the Raspberry Pi camera connected to the Atlas 200 DK (Model:3000) is the input. A super-resolution network model is used for real-time inference and resolution improvement to obtain high-resolution video data, and send the data to the web UI for display. The specific procedure is as follows:
1. The CameraDatasets module interacts with the camera driver to obtain low-resolution (for example, 352 x 288) YUV420SP video data from the camera. The Atlas 200 DK (Model:3000) provides a media API library for developers to easily obtain camera images. For details about how to use the APIs, see “HiAI Media API Reference”.
2. In the pre-processing module SuperResolutionPreProcess, use EZDVPP to resize the image so that the image resolution matches the model input resolution, for example, 256 x 256. It is recommended that the camera image resolution be the same as the model input resolution (352 x 288) to avoid resizing. The Ascend DK provides the EZDVPP, which has encapsulated the DVPP APIs, to help developers preprocess images. For details about how to use the APIs, see the “Ascend DK API Reference”.
3. SuperResolutionInferenceEngine loads the trained super-resolution model and the weight file and performs image inference. Then, the grayscale image data after width and height resolution improvement is obtained.
4. SuperResolutionPostProcess processes the received grayscale image, uses EZDVPP to convert the image into YUV420 and JPEG formats. Then, APIs of Presenter Agent are called to send the converted image to Presenter Server deployed on the UI host. For details about the APIs of Presenter Agent, see the “Ascend DK API Reference”.
5. Presenter Server pushes the received image to the web UI (Presenter Agent).
6. You can access Presenter Server through the Chrome browser and view the video data after super-resolution improvement in real time.
Implementing and Porting the Super-Resolution Algorithm Model
The algorithm model is implemented and ported as follows:
1. Build a training framework for the super-resolution algorithm model based on the Caffe framework and complete model training to obtain a full-precision algorithm model.
2. Use the model manager of Matrix to convert the Caffe model to a model supported by the Ascend 310 AI Processor, as shown in the following figure.
3. Run the converted model in SuperResolutionInferenceEngine and verify the effect and performance of image conversion.
4. Optimize the performance of the algorithm model by using methods such as model quantization and pruning.
During model porting, pay attention to the following implementation details: image input size, image preprocessing, and PSNR calculation.
1.Image input format
Before model inference, the image is processed by the DVPP module. Therefore, the input format must be set to YUV420SP. The value range of the model input data is [0, 1], which is obtained by multiply [0, 255] by 1/255 for normalization.
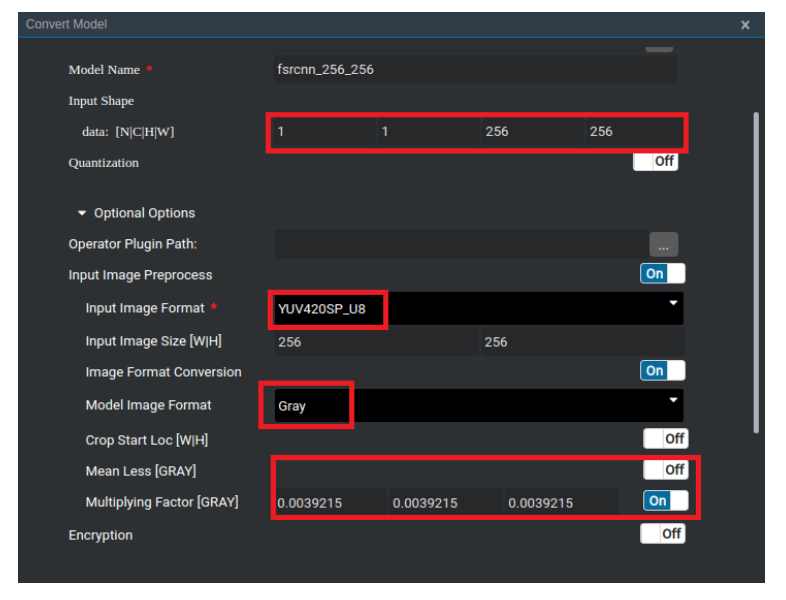
Convert Model page
2.Image pre-processing
The software platform has some limitations. For example, the DVPP does not support grayscale input images, Input Image Preprocess during model conversion cannot be set to grayscale. Therefore, special processing is required for grayscale input images. They should be constructed into colorful images of B=G=R=Gray before subsequent processing. The data format conversion process is as follows: Gray -> BGR -> YUV -> Gray.
Gray -> BGR
OpenCV is used to import images in BGR format. If the input images are grayscale images, OpenCV automatically converts the images into colorful image data in B=G=R=Gray format.
BGR -> YUV
OpenCV is used to import images in BGR format. If the input images are grayscale images, OpenCV automatically converts the images into colorful image data in B=G=R=Gray format.
YUV -> Gray
Set a corresponding parameter during model conversion to convert the YUV420SP images into grayscale images for inference.
3. Deconvolution layer
During the setting-up of the FSRCNN model, it is found that when outputH/W is not divisible by inputH/W, the Deconv layer runs slowly. For example, when kernel_size=9, stride=3, pad=4, inputH/W=256, and outputH=3x256–2=766, the FSRCNN model takes more than hundreds of milliseconds to complete the inference. If pad=3, outputH=3x256=768, which is 3 times inputH/W. The model running speed is greatly improved and the inference takes less than 10 ms. To improve the model implementation speed, outputH/W must be integral multiples of inputH/W.
4. Image display on the web UI
For the second system, real-time camera data is the input data. Grayscale images after being processed by the network will be sent to Presenter Server for display. The procedure is as follows:
Gray -> BGR
Create colorful B=G=R=Gray images based on the grayscale images output by the network.
BGR -> YUV
Use EZDVPP to convert the BGR data into the YUV format.
YUV -> JPEG
Use EZDVPP to convert the YUV data into the JPEG format, and call an API to send the data to Presenter Server.
Set a corresponding parameter during model conversion to convert the YUV420SP images into grayscale images for inference.
After receiving the data, Presenter Server performs a series of subsequent operations including decoding. Finally, grayscale images will be drawn on the web UI. Actually, colorful RGB images with three same components are drawn.
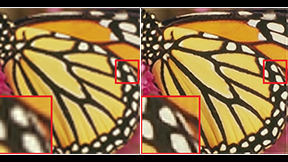
Results and Performance of the Super-Resolution Algorithm
Super-resolution conversion with local image files as the input
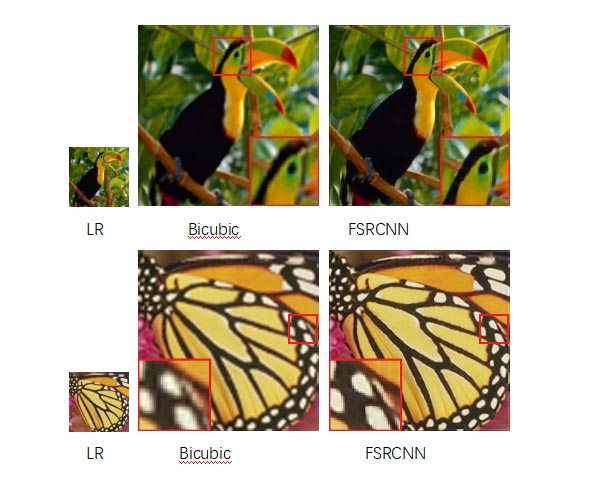
FSRCNN super-resolution network running result on the Atlas 200 DK (Model: 3000)
PSNR test result using the Set5 dataset on the Atlas 200 DK (Model:3000) (dB)
PSNR results of super-resolution algorithm models

Image conversion results with camera image data as the input
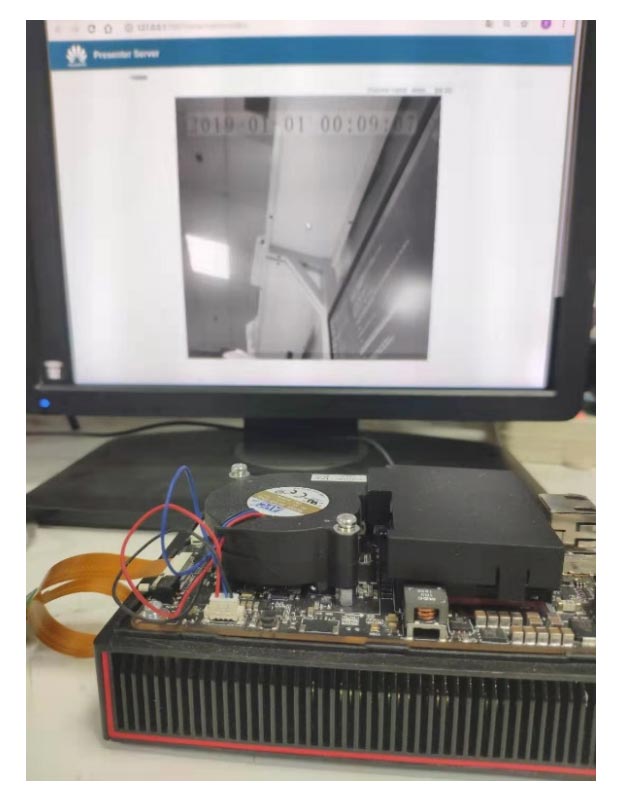
Implementation result of super-resolution image conversion system oriented to real-time camera data input
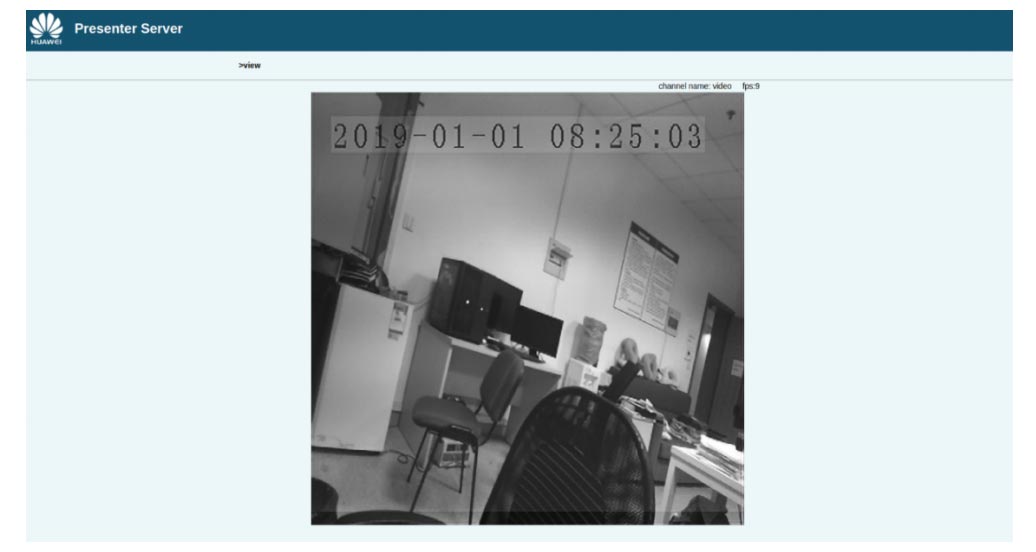
An image displayed on the web UI after being processed by the FSRCNN
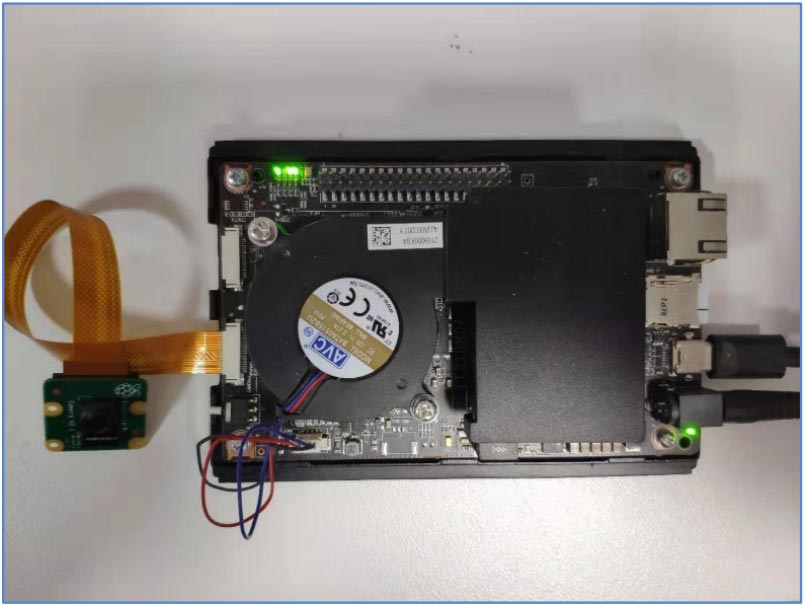
Hardware Platform
This project uses the Atlas 200 DK (Model: 3000) developer board and a Raspberry Pi camera as shown in the following figure.
The following figure shows how the two devices are connected.