save_quant_retrain_model
功能说明
量化感知训练接口,根据用户修改后的模型,插入AscendQuant、AscendDequant等算子,生成最终量化模型,该模型可以用于部署。
约束说明
无。
函数原型
save_quant_retrain_model(config_file, file_name, network, *input_data)
参数说明
参数名 |
输入/返回值 |
含义 |
使用限制 |
|---|---|---|---|
config_file |
输入 |
用户生成的量化感知训练配置文件路径。 |
数据类型:string |
file_name |
输入 |
待输出的air文件路径。 |
数据类型:string |
network |
输入 |
通过create_quant_retrain_model或者restore_quant_retrain_model生成的修改后的模型。 |
数据类型:MindSpore的Cell对象 |
input_data |
输入 |
用户网络输入数据(仅要求数据的format和shape正确,数据本身可以是随机生成的),用于图的编译。 |
数据类型:可以转化为MindSpore Tensor的对象,比如numpy.ndarray对象。 该参数为可变参数,支持用户网络有多个输入的情况。 |
返回值说明
无。
函数输出
可以在昇腾AI处理器做推理的air模型文件。重新执行量化感知训练功能时,该接口输出的上述文件将会被覆盖。
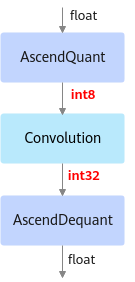
如下图所示,部署模型的AscendQuant层将Float32的输入数据量化为INT8,作为卷积层的输入,权重也是使用INT8数据类型作为计算,在部署模型中的卷积层的计算是基于INT8,INT32数据类型的,输出为INT32数据类型经过AscendDequant层转换成Float32数据类型转输给下一个网络层。
图1 可部署模型


调用示例
1 2 3 4 5 6 7 8 9 10 11 12 13 14 15 16 17 18 19 20 21 22 23 24 25 26 27 28 |
import amct_mindspore as amct from amct_mindspore.initializer import UlqInitializer import numpy as np network = resnet(10) network.set_train(True) ckpt_path = os.path.join(CUR_DIR, './ckpt/resnet50.ckpt') param_dict =load_checkpoint(ckpt_path) load_param_into_net(network, param_dict) input_data = np.random.uniform(0.0, 1.0, size=[32, 3, 224, 224]).astype(np.float32) config_file = os.path.join(CUR_DIR, './retrain_quant_config.json') # 1. create the quant config amct.create_quant_retrain_config(config_file, network, input_data) # scale_offset_record.txt is the record file of calibration initializer = UlqInitializer('./scale_offset_record.txt') # 2. get the quant aware traing retrain_network retrain_network = amct.create_quant_retrain_model(config_file, network, initializer, input_data) # 3. train the modified retrain_network ... # 4. export the retrain_network to deploy model amct.save_quant_retrain_model(config_file, './resnet50_deploy', retrain_network, input_data) |
父主题: 量化感知训练接口