快速入门
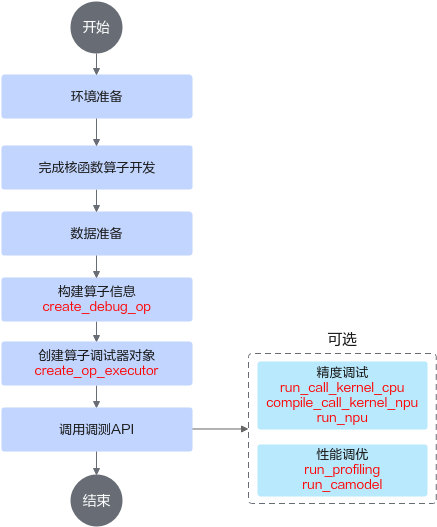
对于核函数直调工程算子开发场景,调测流程如图1所示,支持的调测功能有Tiling调测、CPU孪生调试、NPU编译生成kernel bin文件、NPU上板精度比对、NPU上板Profiling数据采集、性能仿真流水图等。
- 环境准备的具体步骤参见环境准备。
- 完成核函数代码开发。
- 准备好输入数据和标杆数据。可使用现成的bin格式数据文件,也可使用torch/numpy生成Tensor数据(具体参见API方式下数据准备说明)。
- 构建算子信息。
调用ascendebug.create_debug_op接口构造算子DebugOp对象 ,并设置输入/输出信息,示例如下:
import torch import numpy as np import ascendebug # 生成输入/标杆数据,并构建算子信息 x = torch.rand(size=(1, 16384), dtype=torch.float16) y = torch.rand(size=(1, 16384), dtype=torch.float16) z = x + y debug_op = ascendebug.create_debug_op('add_custom', 'VectorCore', '${chip_version}') \ .scalar_input('tileNumIn', 'uint32', 10) \ .tensor_input('x', x) \ .tensor_input('y', y) \ .tensor_output('z', z) - 创建算子调试器对象,示例如下:
op_executor = ascendebug.create_op_executor(debug_op=debug_op, work_dir='./debug_workspace', install_path='/usr/local/Ascend/ascend-toolkit')
- 构造输入参数,调用调测API,以NPU调测接口为例。
kernel_info = ascendebug.OpKernelInfo("/path_to/add_custom.cpp", 'add_custom', [])
npu_option = ascendebug.CompileNpuOptions()
kernel_name, kernel_file, extern = op_executor.compile_call_kernel_npu(kernel_info, npu_option)

run_npu_options = ascendebug.RunNpuOptions(block_num=32)
npu_compile_info = ascendebug.NpuCompileInfo(syncall=extern['cross_core_sync'], task_ration=extern['task_ration'])
op_executor.run_npu(kernel_file, npu_options=run_npu_options, npu_compile_info=npu_compile_info)
使用的API接口列表
本场景涉及的所有调测API如表1所示。
父主题: 核函数直调工程场景的算子调测示例
